A Complete Guide to CSS Grid
Our comprehensive guide to CSS grid, focusing on all the settings both for the grid parent container and the grid child elements.
UGURUS by DigitalOcean for agency owners
UGURUS offers elite coaching and mentorship for agency owners looking to grow. Start with the free Agency Accelerator today.
Table of contents
Reference this guide a lot? Here’s a high-res image you can print!

Introduction to CSS Grid
CSS Grid Layout (aka “Grid” or “CSS Grid”), is a two-dimensional grid-based layout system that, compared to any web layout system of the past, completely changes the way we design user interfaces. CSS has always been used to layout our web pages, but it’s never done a very good job of it. First, we used tables, then floats, positioning and inline-block, but all of these methods were essentially hacks and left out a lot of important functionality (vertical centering, for instance). Flexbox is also a very great layout tool, but its one-directional flow has different use cases — and they actually work together quite well! Grid is the very first CSS module created specifically to solve the layout problems we’ve all been hacking our way around for as long as we’ve been making websites.
The intention of this guide is to present the Grid concepts as they exist in the latest version of the specification. So I won’t be covering the out-of-date Internet Explorer syntax (even though you can absolutely use Grid in IE 11) or other historical hacks.
CSS Grid basics
As of March 2017, most browsers shipped native, unprefixed support for CSS Grid: Chrome (including on Android), Firefox, Safari (including on iOS), and Opera. Internet Explorer 10 and 11 on the other hand support it, but it’s an old implementation with an outdated syntax. The time to build with grid is now!
To get started you have to define a container element as a grid with display: grid , set the column and row sizes with grid-template-columns and grid-template-rows , and then place its child elements into the grid with grid-column and grid-row . Similarly to flexbox, the source order of the grid items doesn’t matter. Your CSS can place them in any order, which makes it super easy to rearrange your grid with media queries. Imagine defining the layout of your entire page, and then completely rearranging it to accommodate a different screen width all with only a couple lines of CSS. Grid is one of the most powerful CSS modules ever introduced.
Important CSS Grid terminology
Before diving into the concepts of Grid it’s important to understand the terminology. Since the terms involved here are all kinda conceptually similar, it’s easy to confuse them with one another if you don’t first memorize their meanings defined by the Grid specification. But don’t worry, there aren’t many of them.
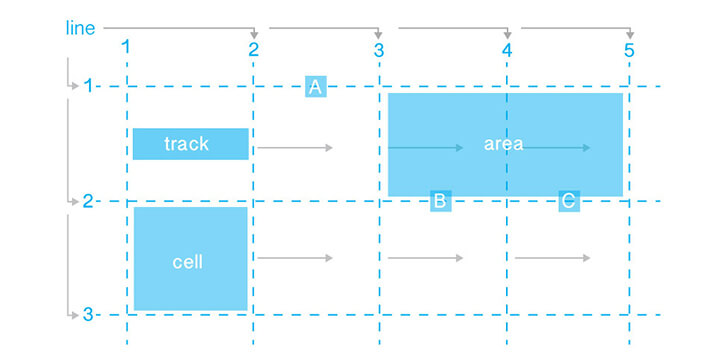
The element on which display: grid is applied. It’s the direct parent of all the grid items. In this example container is the grid container.
The dividing lines that make up the structure of the grid. They can be either vertical (“column grid lines”) or horizontal (“row grid lines”) and reside on either side of a row or column. Here the yellow line is an example of a column grid line.
The space between two adjacent grid lines. You can think of them as the columns or rows of the grid. Here’s the grid track between the second and third-row grid lines.
The total space surrounded by four grid lines. A grid area may be composed of any number of grid cells. Here’s the grid area between row grid lines 1 and 3, and column grid lines 1 and 3.
The children (i.e. direct descendants) of the grid container. Here the item elements are grid items, but sub-item isn’t.
The space between two adjacent row and two adjacent column grid lines. It’s a single “unit” of the grid. Here’s the grid cell between row grid lines 1 and 2, and column grid lines 2 and 3.
CSS Grid properties
Properties for the Parent
(Grid Container)
Defines the element as a grid container and establishes a new grid formatting context for its contents.
- grid – generates a block-level grid
- inline-grid – generates an inline-level grid
The ability to pass grid parameters down through nested elements (aka subgrids) has been moved to level 2 of the CSS Grid specification. Here’s a quick explanation.
Defines the columns and rows of the grid with a space-separated list of values. The values represent the track size, and the space between them represents the grid line.
- <track-size> – can be a length, a percentage, or a fraction of the free space in the grid using the fr unit (more on this unit over at DigitalOcean)
- <line-name> – an arbitrary name of your choosing
Grid lines are automatically assigned positive numbers from these assignments (-1 being an alternate for the very last row).
But you can choose to explicitly name the lines. Note the bracket syntax for the line names:
Note that a line can have more than one name. For example, here the second line will have two names: row1-end and row2-start:
If your definition contains repeating parts, you can use the repeat() notation to streamline things:
Which is equivalent to this:
If multiple lines share the same name, they can be referenced by their line name and count.
The fr unit allows you to set the size of a track as a fraction of the free space of the grid container. For example, this will set each item to one third the width of the grid container:
The free space is calculated after any non-flexible items. In this example the total amount of free space available to the fr units doesn’t include the 50px:
Defines a grid template by referencing the names of the grid areas which are specified with the grid-area property. Repeating the name of a grid area causes the content to span those cells. A period signifies an empty cell. The syntax itself provides a visualization of the structure of the grid.
- <grid-area-name> – the name of a grid area specified with grid-area
- . – a period signifies an empty grid cell
- none – no grid areas are defined
That’ll create a grid that’s four columns wide by three rows tall. The entire top row will be composed of the header area. The middle row will be composed of two main areas, one empty cell, and one sidebar area. The last row is all footer.
Each row in your declaration needs to have the same number of cells.
You can use any number of adjacent periods to declare a single empty cell. As long as the periods have no spaces between them they represent a single cell.
Notice that you’re not naming lines with this syntax, just areas. When you use this syntax the lines on either end of the areas are actually getting named automatically. If the name of your grid area is foo, the name of the area’s starting row line and starting column line will be foo-start, and the name of its last row line and last column line will be foo-end. This means that some lines might have multiple names, such as the far left line in the above example, which will have three names: header-start, main-start, and footer-start.
A shorthand for setting grid-template-rows , grid-template-columns , and grid-template-areas in a single declaration.
- none – sets all three properties to their initial values
- <grid-template-rows> / <grid-template-columns > – sets grid-template-columns and grid-template-rows to the specified values, respectively, and sets grid-template-areas to none
It also accepts a more complex but quite handy syntax for specifying all three. Here’s an example:
That’s equivalent to this:
Since grid-template doesn’t reset the implicit grid properties ( grid-auto-columns , grid-auto-rows , and grid-auto-flow ), which is probably what you want to do in most cases, it’s recommended to use the grid property instead of grid-template .
Specifies the size of the grid lines. You can think of it like setting the width of the gutters between the columns/rows.
- <line-size> – a length value
The gutters are only created between the columns/rows, not on the outer edges.
Note: The grid- prefix will be removed and grid-column-gap and grid-row-gap renamed to column-gap and row-gap . The unprefixed properties are already supported in Chrome 68+, Safari 11.2 Release 50+, and Opera 54+.
A shorthand for row-gap and column-gap
- <grid-row-gap> <grid-column-gap> – length values
If no row-gap is specified, it’s set to the same value as column-gap
Note: The grid- prefix is deprecated (but who knows, may never actually be removed from browsers). Essentially grid-gap renamed to gap . The unprefixed property is already supported in Chrome 68+, Safari 11.2 Release 50+, and Opera 54+.
Aligns grid items along the inline (row) axis (as opposed to align-items which aligns along the block (column) axis). This value applies to all grid items inside the container.
- start – aligns items to be flush with the start edge of their cell
- end – aligns items to be flush with the end edge of their cell
- center – aligns items in the center of their cell
- stretch – fills the whole width of the cell (this is the default)
This behavior can also be set on individual grid items via the justify-self property.
Aligns grid items along the block (column) axis (as opposed to justify-items which aligns along the inline (row) axis). This value applies to all grid items inside the container.
- stretch – fills the whole height of the cell (this is the default)
- start – aligns items to be flush with the start edge of their cell
- end – aligns items to be flush with the end edge of their cell
- center – aligns items in the center of their cell
- baseline – align items along text baseline. There are modifiers to baseline — first baseline and last baseline which will use the baseline from the first or last line in the case of multi-line text.
This behavior can also be set on individual grid items via the align-self property.
There are also modifier keywords safe and unsafe (usage is like align-items: safe end ). The safe keyword means “try to align like this, but not if it means aligning an item such that it moves into inaccessible overflow area”, while unsafe will allow moving content into inaccessible areas (“data loss”).
place-items sets both the align-items and justify-items properties in a single declaration.
- <align-items> / <justify-items> – The first value sets align-items , the second value justify-items . If the second value is omitted, the first value is assigned to both properties.
This can be very useful for super quick multi-directional centering:
Sometimes the total size of your grid might be less than the size of its grid container. This could happen if all of your grid items are sized with non-flexible units like px . In this case you can set the alignment of the grid within the grid container. This property aligns the grid along the inline (row) axis (as opposed to align-content which aligns the grid along the block (column) axis).
- start – aligns the grid to be flush with the start edge of the grid container
- end – aligns the grid to be flush with the end edge of the grid container
- center – aligns the grid in the center of the grid container
- stretch – resizes the grid items to allow the grid to fill the full width of the grid container
- space-around – places an even amount of space between each grid item, with half-sized spaces on the far ends
- space-between – places an even amount of space between each grid item, with no space at the far ends
- space-evenly – places an even amount of space between each grid item, including the far ends
Sometimes the total size of your grid might be less than the size of its grid container. This could happen if all of your grid items are sized with non-flexible units like px . In this case you can set the alignment of the grid within the grid container. This property aligns the grid along the block (column) axis (as opposed to justify-content which aligns the grid along the inline (row) axis).
- start – aligns the grid to be flush with the start edge of the grid container
- end – aligns the grid to be flush with the end edge of the grid container
- center – aligns the grid in the center of the grid container
- stretch – resizes the grid items to allow the grid to fill the full height of the grid container
- space-around – places an even amount of space between each grid item, with half-sized spaces on the far ends
- space-between – places an even amount of space between each grid item, with no space at the far ends
- space-evenly – places an even amount of space between each grid item, including the far ends
place-content sets both the align-content and justify-content properties in a single declaration.
- <align-content> / <justify-content> – The first value sets align-content , the second value justify-content . If the second value is omitted, the first value is assigned to both properties.
All major browsers except Edge support the place-content shorthand property.
Specifies the size of any auto-generated grid tracks (aka implicit grid tracks). Implicit tracks get created when there are more grid items than cells in the grid or when a grid item is placed outside of the explicit grid. (see The Difference Between Explicit and Implicit Grids)
- <track-size> – can be a length, a percentage, or a fraction of the free space in the grid (using the fr unit)
To illustrate how implicit grid tracks get created, think about this:
This creates a 2 x 2 grid.
But now imagine you use grid-column and grid-row to position your grid items like this:
We told .item-b to start on column line 5 and end at column line 6, but we never defined a column line 5 or 6. Because we referenced lines that don’t exist, implicit tracks with widths of 0 are created to fill in the gaps. We can use grid-auto-columns and grid-auto-rows to specify the widths of these implicit tracks:
If you have grid items that you don’t explicitly place on the grid, the auto-placement algorithm kicks in to automatically place the items. This property controls how the auto-placement algorithm works.
- row – tells the auto-placement algorithm to fill in each row in turn, adding new rows as necessary (default)
- column – tells the auto-placement algorithm to fill in each column in turn, adding new columns as necessary
- dense – tells the auto-placement algorithm to attempt to fill in holes earlier in the grid if smaller items come up later
Note that dense only changes the visual order of your items and might cause them to appear out of order, which is bad for accessibility.
Consider this HTML:
You define a grid with five columns and two rows, and set grid-auto-flow to row (which is also the default):
When placing the items on the grid, you only specify spots for two of them:
Because we set grid-auto-flow to row , our grid will look like this. Notice how the three items we didn’t place (item-b, item-c and item-d) flow across the available rows:
If we instead set grid-auto-flow to column , item-b, item-c and item-d flow down the columns:
A shorthand for setting all of the following properties in a single declaration: grid-template-rows , grid-template-columns , grid-template-areas , grid-auto-rows , grid-auto-columns , and grid-auto-flow (Note: You can only specify the explicit or the implicit grid properties in a single grid declaration).
- none – sets all sub-properties to their initial values.
- <grid-template> – works the same as the grid-template shorthand.
- <grid-template-rows> / [ auto-flow && dense? ] <grid-auto-columns>? – sets grid-template-rows to the specified value. If the auto-flow keyword is to the right of the slash, it sets grid-auto-flow to column . If the dense keyword is specified additionally, the auto-placement algorithm uses a “dense” packing algorithm. If grid-auto-columns is omitted, it is set to auto .
- [ auto-flow && dense? ] <grid-auto-rows>? / <grid-template-columns> – sets grid-template-columns to the specified value. If the auto-flow keyword is to the left of the slash, it sets grid-auto-flow to row . If the dense keyword is specified additionally, the auto-placement algorithm uses a “dense” packing algorithm. If grid-auto-rows is omitted, it is set to auto .
The following two code blocks are equivalent:
The following two code blocks are equivalent:
The following two code blocks are equivalent:
And the following two code blocks are equivalent:
It also accepts a more complex but quite handy syntax for setting everything at once. You specify grid-template-areas , grid-template-rows and grid-template-columns , and all the other sub-properties are set to their initial values. What you’re doing is specifying the line names and track sizes inline with their respective grid areas. This is easiest to describe with an example:
That’s equivalent to this:
Properties for the Children
(Grid Items)
float , display: inline-block , display: table-cell , vertical-align and column-* properties have no effect on a grid item.
Determines a grid item’s location within the grid by referring to specific grid lines. grid-column-start / grid-row-start is the line where the item begins, and grid-column-end / grid-row-end is the line where the item ends.
- <line> – can be a number to refer to a numbered grid line, or a name to refer to a named grid line
- span <number> – the item will span across the provided number of grid tracks
- span <name> – the item will span across until it hits the next line with the provided name
- auto – indicates auto-placement, an automatic span, or a default span of one
If no grid-column-end / grid-row-end is declared, the item will span 1 track by default.
Items can overlap each other. You can use z-index to control their stacking order.
Learn more about the span notation in this article by DigitalOcean.
- <start-line> / <end-line> – each one accepts all the same values as the longhand version, including span
If no end line value is declared, the item will span 1 track by default.
Gives an item a name so that it can be referenced by a template created with the grid-template-areas property. Alternatively, this property can be used as an even shorter shorthand for grid-row-start + grid-column-start + grid-row-end + grid-column-end .
- <name> – a name of your choosing
- <row-start> / <column-start> / <row-end> / <column-end> – can be numbers or named lines
As a way to assign a name to the item:
Aligns a grid item inside a cell along the inline (row) axis (as opposed to align-self which aligns along the block (column) axis). This value applies to a grid item inside a single cell.
- start – aligns the grid item to be flush with the start edge of the cell
- end – aligns the grid item to be flush with the end edge of the cell
- center – aligns the grid item in the center of the cell
- stretch – fills the whole width of the cell (this is the default)
To set alignment for all the items in a grid, this behavior can also be set on the grid container via the justify-items property.
Aligns a grid item inside a cell along the block (column) axis (as opposed to justify-self which aligns along the inline (row) axis). This value applies to the content inside a single grid item.
- start – aligns the grid item to be flush with the start edge of the cell
- end – aligns the grid item to be flush with the end edge of the cell
- center – aligns the grid item in the center of the cell
- stretch – fills the whole height of the cell (this is the default)
To align all the items in a grid, this behavior can also be set on the grid container via the align-items property.
place-self sets both the align-self and justify-self properties in a single declaration.
- auto – The “default” alignment for the layout mode.
- <align-self> / <justify-self> – The first value sets align-self , the second value justify-self . If the second value is omitted, the first value is assigned to both properties.
All major browsers except Edge support the place-self shorthand property.
Special Units & Functions
You’ll likely end up using a lot of fractional units in CSS Grid, like 1fr . They essentially mean “portion of the remaining space”. So a declaration like:
Means, loosely, 25% 75% . Except that those percentage values are much more firm than fractional units are. For example, if you added padding to those percentage-based columns, now you’ve broken 100% width (assuming a content-box box model). Fractional units also much more friendly in combination with other units, as you can imagine:
When sizing rows and columns, you can use all the lengths you are used to, like px , rem, %, etc, but you also have keywords:
- min-content : the minimum size of the content. Imagine a line of text like “E pluribus unum”, the min-content is likely the width of the word “pluribus”.
- max-content : the maximum size of the content. Imagine the sentence above, the max-content is the length of the whole sentence.
- auto : this keyword is a lot like fr units, except that they “lose” the fight in sizing against fr units when allocating the remaining space.
- Fractional units: see above
- The fit-content() function uses the space available, but never less than min-content and never more than max-content .
- The minmax() function does exactly what it seems like: it sets a minimum and maximum value for what the length is able to be. This is useful for in combination with relative units. Like you may want a column to be only able to shrink so far. This is extremely useful and probably what you want:
- The min() function.
- The max() function.
The repeat() Function and Keywords
The repeat() function can save some typing:
But repeat() can get extra fancy when combined with keywords:
- auto-fill : Fit as many possible columns as possible on a row, even if they are empty.
- auto-fit: Fit whatever columns there are into the space. Prefer expanding columns to fill space rather than empty columns.
This bears the most famous snippet in all of CSS Grid and one of the all-time great CSS tricks:
The difference between the keywords is spelled out in detail here.
An experimental feature of CSS grid is masonry layout. Note that there are lots of approaches to CSS masonry, but mostly of them are trickery and either have major downsides or aren’t what you quite expect.
The spec has an official way now, and this is behind a flag in Firefox:
Subgrid is an extremely useful feature of grids that allows grid items to have a grid of their own that inherits grid lines from the parent grid.
This is only supported in Firefox right now, but it really needs to get everywhere.
It’s also useful to know about display: contents; . This is not the same as subgrid, but it can be a useful tool sometimes in a similar fashion.
CSS Grid browser support
This browser support data is from Caniuse, which has more detail. A number indicates that browser supports the feature at that version and up.
Desktop
| Chrome | Firefox | IE | Edge | Safari |
|---|---|---|---|---|
| 57 | 52 | 11* | 16 | 10.1 |
Mobile / Tablet
| Android Chrome | Android Firefox | Android | iOS Safari |
|---|---|---|---|
| 117 | 117 | 117 | 10.3 |
Fluid columns snippet
Fluid width columns that break into more or less columns as space is available, with no media queries!
CSS Grid animation
According to the CSS Grid Layout Module Level 1 specification, there are 5 animatable grid properties:
- grid-gap , grid-row-gap , grid-column-gap as length, percentage, or calc.
- grid-template-columns , grid-template-rows as a simple list of length, percentage, or calc, provided the only differences are the values of the length, percentage, or calc components in the list.
As of this writing, only the animation of (grid-)gap , (grid-)row-gap , (grid-)column-gap is implemented in any of the tested browsers.
Золотая рыбка CSS3 Grid Layout (часть 3)
Благодаря нашим недавним погружениям в волшебный мир этого модуля, мы уже смогли прочувствовать его силу и невероятные возможности, которыми он наделён. Но, несмотря на множество примеров и описаний разделов CSS Grid Layout Module Level 1, есть ещё немало сюрпризов, о которых стоит поговорить. Поэтому, как вы уже догадались, в этой статье мы продолжим прогулку по этой спецификации, ведь золотая рыбка задолжала нам ещё желания;)
Кстати, так совпало, что параллельно с нами Эмиль Бьёрклунд также ведёт свою серию статей, посвящённую спецификации Grid Layout. Поэтому, чтобы лучше прояснить для себя механизм этой раскладки, мы настоятельно рекомендуем ознакомиться со статьями Эмиля. Для этого можно пройти к нему в гости, либо прочитать перевод у нас на сайте.
Повторение колонок и рядов с функцией repeat()
Вы наверняка знаете свойство background-repeat , которое отвечает за повторение фоновой картинки в элементе. Вот и в модуле Grid Layout есть нечто похожее, но только для повторения колонок/рядов.
Представляю вам функцию repeat() , при помощи которой можно создать повторяющийся паттерн для построения колонок/рядов, описанный в компактной форме.
Например, возьмём CSS-код из спецификации:
Обратите внимание на повторяющиеся названия именованных линий, которые находятся в разных скобках. Как вы поняли, так тоже можно делать. Чуть позже в этой статье мы разберём примеры того, где это может пригодится, а пока вернёмся к repeat() .
При помощи repeat() то же самое CSS-объявление выглядит так:
Намного короче, неправда ли? Но давайте разберёмся. Я не стану приводить скриншоты, поскольку здесь достаточно простого объяснения, как работает эта функция. Первый аргумент в repeat() , это число повторений паттерна. В нашем случае паттерн будет повторяться 4 раза. Далее мы уже описываем сам паттерн: величину колонок, именованные линии и т.д. Всё просто. Очевидно, что эта функция очень полезна при большом количестве ячеек. И также не забывайте, что repeat() легко можно использовать и для построения рядов в свойстве grid-template-rows.
Обращение к полосам
По умолчанию грид-элементы распределяются по сетке в обычном порядке, как они идут в разметке. Но что если нам нужно раскидать блоки по конкретным колонкам/рядам? Grid Layout позаботился и об этом, предоставив пару способов. Рассмотрим каждый из них.
Способ с уникальными названиями грид-линий
Ранее (в этой и предыдущих статьях) мы уже научились создавать сетки разными методами, например, при помощи уникальных названий грид-линий. Поэтому в ниже представленной разметке и стилях вы не увидите ничего эдакого.
Мы воспользовались свойством grid-template-columns , чтобы создать сетку, состоящую из девяти колонок (четыре широких по 100px в ширину и пять узких по 10px). Нечто подобное мы проделывали здесь, только в нашем случае ширина первой колонки (а значит расстояние между началом первой и второй линией) будет 10px, второй (между [col1-start] и [col1-end]) — 100px, третьей — 10px и т.д.
В нашем грид-контейнере находится шесть грид-элементов. Представим, что нам нужно поместить в первую, третью и четвёртую широкие колонки по два блока, а вторую широкую колонку (и соответственно остальные узкие по 10px) пропустить. Для этого нам нужен такой CSS:
![]()
Я специально сделал границу, чтобы было видно пустые колонки (ячейки грида). Элементы находятся во второй, в шестой и в восьмой колонках, а остальные колонки пустуют. Как вы, возможно, догадались из CSS-кода, произошло это потому, что с помощью свойства grid-column мы обратились к нужным нам колонкам по уникальными именам их границ ( [col1-start] , [col3-start] , [col4-start] ), приказав, например, первому и четвёртому элементам ( div:nth-child(3n + 1) ) оказаться в колонке, начинающейся от линии col1-start .
Способ с одинаковыми названиями грид-линий
Только что благодаря уникальным именам грид-линий мы легко раскидали элементы по нужным колонкам. Но что делать, если названия грид-линий не уникальны? Но и в этом случае Grid Layout нас не подвёл!
В HTML поменяем только класс у грид-контейнера.
А в CSS уберём цифры из названий линий, сделав их одинаковыми:
Мы заменили все col*-start на просто col-start , проделав тоже самое и с col*-end . И теперь при этом нам нужно получить такой же результат, что и в предыдущем примере. Как это сделать? Да легко. Мы просто обратимся к грид-линиям по номерам:
И вот результат. Знакомый, не правда ли?
![]()
Это напоминает массив, только номера начинаются с цифры 1, а не с цифры 0, как мы привыкли. В свойстве grid-template-columns четыре линии col-start , следовательно к первой можно обратиться col-start 1 , ко второй col-start 2 , и т.д. Понятно, что, например, col-start 1 будет равнозначна col1-start из предыдущего примера. Поэтому, чтобы заставить первый и четвёртый элементы ( div:nth-child(3n + 1) ) занять вторую колонку, мы просто присвоили их свойству grid-column значение col-start с номером 1 .
Автоматическое размещение
Согласно автоматическому алгоритму размещения Grid Layout, грид-элементы выкладываются по сетке в грид-контейнере друг за другом, заполняя собой свободное пространство. Если, например, грид-элементу не хватает места в первом ряду, то он автоматически переходит на второй ряд. Вся прелесть здесь в том, что Grid Layout позволяет нам взять алгоритм автозразмещения под свой контроль! Это напоминает свойство flex-direction в Flexbox, только круче и в контексте Grid Layout.
Давайте рассмотрим это сразу на примерах, начав с простых и закончив более сложным из спецификации.
Для начала воспользуемся уже знакомыми нам свойствами grid-template-columns и grid-template-rows и создадим грид-сетку 3х3, где колонки будут занимать по 200px, а ряды — по 100px. Элементов при этом будет семь, поскольку так нагляднее для понимания алгоритма.
Здесь всё вроде бы ясно, поэтому пора познакомиться с новым свойством grid-auto-flow , которое как раз и отвечает за алгоритм размещения грид-элементов по сетке. У этого свойства есть два значения: row , column , плюс к каждому из них может добавляться ещё одно волшебное значение dense. Последнее ( dense ) мы обсудим чуть позже, а пока посмотрим, как ведёт себя алгоритм без него. Первое значение rows (значение по умолчанию) приказывает элементам выстраиваться слева направо, идя по рядам, заполняя каждую грид-ячейку. Такое поведение можно наблюдать на рисунке выше.
А сейчас давайте поменяем значение свойства grid-auto-flow с row на column .

Не трудно догадаться, что произошло. Теперь грид-элементы выстраиваются не слева направо, а сверху вниз, следуя уже не по рядам, а по колонкам.
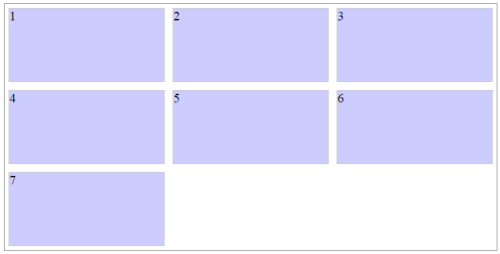
А теперь перейдём к самому страшному более сложному примеру из спецификации, чтобы увидеть всю прелесть значения dense .
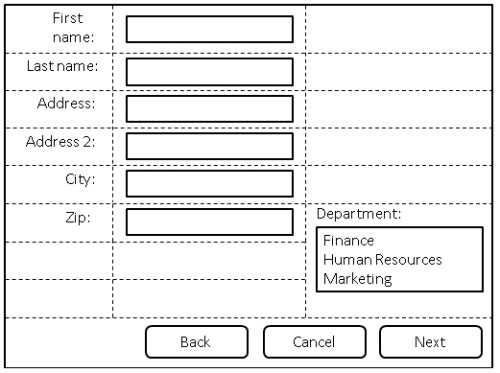
Представим, что у нас есть форма с полями, метками и отдельным блоком (на место расположение которого, кстати, стоит обратить особое внимание, см. блок #department-block ) с выпадающим списком внутри, ну и блок с кнопками.
Наша задача раскидать метки, поля и отдельный блок по своим колонкам (всего три колонки), а блоку с кнопками отвести отдельный ряд в самом низу.
Я немного упростил пример и переделал картинку из спецификации, чтобы было наглядно понятно, что происходит
Для начала давайте разберёмся, что вообще происходит. В этом примере собрано множество грид-механизмов, с которыми мы уже знакомы. Например, взять вот это объявление:
Мы уже проделывали подобный трюк в этой статье (см. раздел «Способ с уникальными названиями грид-линий»), где давали уникальные названия грид-линиям, чтобы потом разбросать нужные элементы по «именованным колонкам». Единственное отличие здесь в том, что расстояние между линиями (колонками) не фиксированное (auto), поэтому ширина колонок определяется шириной элементов.
Дальше у нас идут такие блоки объявлений:
Свойство grid-column нам также знакомо, поэтому вы уже наверное догадались, что для меток (label) у нас отведена первая колонка, для полей — вторая, а для блока #department-block — третья.
Здесь стоит отметить несколько важных моментов. У свойства grid-row меток и полей стоит значение auto , поэтому ряды будут заполняться по мере необходимости. С этим всё понятно, но о чём нам говорит значение span 3 у свойства grid-row блока #department-block ? О том, что блок #department-block будет занимать три ряда (span 3).
А вот в каком ряду будет располагаться #department-block , нам расскажет наше загадочное значение dense .
Без dense алгоритм может «переть» только вперед, не оглядываясь назад. Поскольку метки и поля могут находиться только в своих выделенных колонках, то при их размещении алгоритм вынужден опускаться всё ниже и ниже. Когда он доходит до блока #department-block , алгоритм находится на 6 ряду — столько перед ним было меток и полей — и этот блок продолжает этот же 6 ряд.
А вот теперь мы подошли к самому главному — к dense — третьему значению свойства grid-auto-flow . Давайте посмотрим, что может сотворить эта мощная штука.

Как видно на рисунке, блоку #department-block больше не приходится опускаться вниз и ждать своей очереди, чтобы занять свой ряд. Благодаря dense алгоритм теперь учитывает пропущенные строки и размещает #department-block сразу же в первой строке его ряда.
Filling holes in CSS Grid with auto flow dense
![]()
CSS Grid enables responsive elements with variable sized grid items all without media queries. You may have hit a problem though. After creating different sized grid items there are holes left in the layout where a grid item didn’t fit. The spec writers thought of this scenario and with grid-auto-flow, you utilise a packing algorithm to fill those holes with grid items as they’re found.
Here’s the CodePen example of the layout we are going to create. It’s a grid of card items with banner-like cards every seventh item.
The code for this layout can be boiled down to this:
Let’s take a look at the code for each technique.
RAM (Repeat, Auto, Minmax)
Una Kravets introduced me to the acronym RAM in her article Ten modern layouts in one line of CSS. RAM stands for Repeat, auto, minmax and the technique ensures items auto-fit to the grid and the value is no smaller than the minimum and no larger than the maximum value. It achieves responsive grid items without media queries. Awesome!
Spanning
Spanning grid item uses a technique I covered in Superhero layout series layering panels, but recapping; CSS Grid lines are numbered 1 to n (n being the total number of lines) but also in reverse from -1 to -n. This allows us to set the grid columns to 1 / -1 which begins at the first grid line and ends on the last grid line, thus spanning the full width of the grid — even if the number of columns changes!
Combined with the nth-child selector we can target every 7 items in the grid:
Filling the gaps with grid-auto-flow
Now with responsive grid items and spanning banners we can see the hole issue which looks like this:
To resolve this we set the following on our grid:
The dense attribute tells the packing algorithm to layout grid items in a way that when it finds an item that will fill in a gap, use that item to do so. We now have all the requirements of the layout.
Keep in mind…
This approach moves the items from their defined source order. A possible accessibility issue. Depending on the layout this might not be an issue but worth considering if you take this approach. Take a look at the labels in this screenshot:
Notice items 8 and 9 are now before item 7, despite the source code order. If your content is reliant on the order then this technique might not be the best choice. A list of product cards though would be ok.
I hope this article has been useful in learning some tips and tricks with CSS Grid especially if you ever found yourself with gaps in your grid. Take a look at the demo on CodePen which allows you to toggle between dense and the regular row value of grid-auto-flow. I find interactive demos like this a great way to gain an understanding of concepts.
Полное руководство по CSS Grid
CSS Grid Layout — самая мощная система компоновки из доступных на данный момент в CSS. Это двумерная система, которая может обрабатывать как колонки так и строки, в отличии от Flexbox, который в значительной степени является одномерной системой. При работе с CSS Grid, вы применяете CSS правила и родительским элементам (которые становятся Grid контейнерами) и к дочерним элементам (которые становятся Grid элементами).
Введение
CSS Grid Layout (aka «Grid») — это двумерная система компоновки основанная на сетке, цель которой заключается в том чтобы полностью изменить способ проектирования пользовательских интерфейсов основанных на сетке. CSS всегда использовался для разметки веб-страниц, но никогда не делал эту работу хорошо. Сначала мы использовали таблицы, потом обтекания (floats), позиционирование и инлайновые блоки (inline-block), но все эти методы по существу являются просто хаками и опускают много важных функциональных возможностей (например, вертикальное выравнивание). Flexbox помог, но он предназначен для более простых одномерных макетов, а не для сложных двумерных (на самом деле Flexbox и Grid очень хорошо работают вместе). CSS Grid’ы — это первый модуль созданный специально для решения проблем компоновки, которые до сих пор мы решали с помощью хаков при создании сайтов. Есть две основные вещи, которые вдохновили меня на создание этого руководства. Первое, это замечательная книга от Rachel Andrew’s Get Ready for CSS Grid Layout. Это подробное и понятное введение в CSS Grid’ы, которое является основой для всей этой статьи. Я настоятельно рекомендую купить и прочитать его. Вторая вещь, которая меня вдохновила — это A Complete Guide to Flexbox (Полное руководство по Flexbox) от Chris Coyier’s, которая стала моим основным ресурсом по Flexbox. Она помогла большому количеству людей, о этом свидетельствует тот факт, что это лучший результат в поисковой выдаче при запросе»Flexbox» в Google. Вы увидите много похожего между этой статьей и моей, потому что почему бы не украсть у лучших?
Моя цель в этом руководстве — это возможность представить вам концепции CSS Grid’ов так как они существуют в самой последней версии спецификации. Поэтому я не буду освещать устаревший синтаксис для IE и сделаю всё возможное, чтобы это руководство регулярно обновлялось, по мере изменения спецификации.
Основы и поддержка браузерами
Для того чтобы начать работу, нам нужно определить элемент-контейнер с помощью display: grid, настроить размеры колонок и строк с помощью grid-template-columns и grid-template-rows, а также разместить его дочерние элементы внутри сетки с помощью grid-column и grid-row. Так же как и во Flexbox, порядок элементов в источнике сетки, не имеет значения (прим. переводчика: в HTML разметке). Ваш CSS может размещать их в любом порядке, что собственно упрощает перегруппировку сетки с помощью медиа запросов. Представьте, что вы определяете разметку всей страницы, а затем полностью переставляете её, чтобы разместить элементы под другую ширину экрана всего лишь с помощью нескольких CSS строк кода. CSS Grid — это один из самых мощных CSS модулей, представленных когда-либо. По состоянию на март 2017 года, многие браузеры уже поддерживают CSS Grid, без префиксов: Chrome (включая Android), Firefox, Safari (включая iOS), и Opera. Internet Explorer 10 и 11 поддерживают его но с реализацией более старого синтаксиса. Была анонсирована поддержка в Edge, но её пока нет.