How To Remove A Network From Metamask
Metamask is the leading decentralized non-custodial crypto wallet out there and the top choice of many new and experienced investors alike in the crypto space.
One of the many advantages of Metamask over many other crypto wallets out there is the ability to add EVM-compatible networks and tokens on these networks to your wallet.
If you have added a network to your Metamask wallet in the past and you’re looking to remove this network (or a bunch of other networks) from your wallet but don’t know how to get started, then you’re on the right page.
In this article, we will be showing you how to remove a network from Metamask in a few easy steps. You will also learn how to remove networks on the Metamask mobile app as well as how to also remove test networks (testnets) that come pre-configured on your wallet.
How To Delete A Network On Metamask
- Open Metamask and unlock your wallet.
- Click the network selection box.
- Click on the “X” sign next to the network to be deleted.
- Select [Delete] on the confirmation dialog.
How To Remove A Network From Metamask (Guide With Pictures)
If you don’t intend to use a network that was added to your Metamask wallet any longer, you can simply remove the network from your wallet.
While deleting a network from your wallet will not delete your tokens on that network, we advise you to transfer or swap the tokens on the network you intend to delete before actually deleting the network.
To delete a network from your Metamask wallet, launch the Metamask extension and click on the network selection box. Now, scroll down and click on the “X” sign next to the network you want to delete to remove it from your wallet.
Below is a step-by-step guide with detailed screenshots showing how you can remove a network from your Metamask wallet.
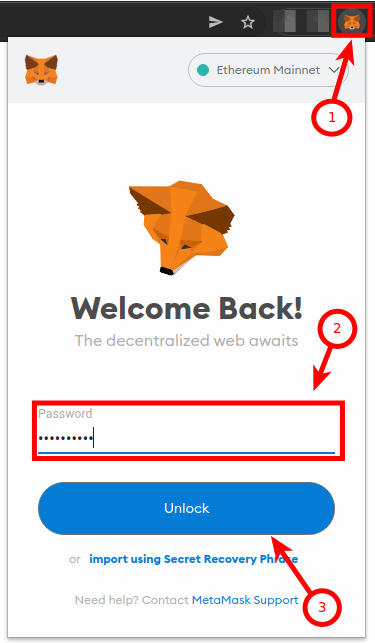
Step 1: Launch the Metamask extension and unlock your wallet.
Before you can do anything on Metamask, you first need to launch the extension on your browser.
To do this, click on the Metamask logo in the extensions area of your browser then enter your account password and click [Unlock] to unlock your wallet.
We are assuming that you’re already a Metamask user but if you haven’t set up Metamask on your device, you can visit the Metamask download page and install the correct version of Metamask depending on your web browser of choice.
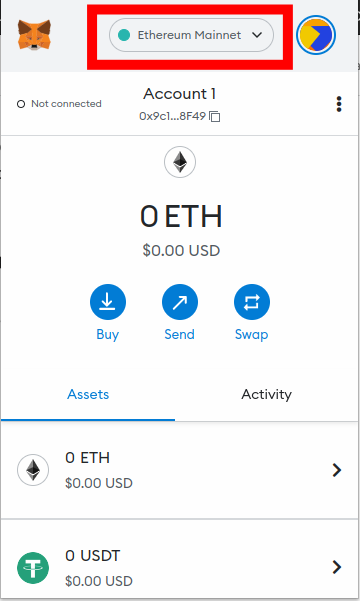
Step 2: Click on the network selection box on the Metamask home screen.
After unlocking your wallet, you should see the Metamask home screen with your available balances.
Now click on the network selection box at the top center of the page to view the list of available (configured) networks on your Metamask wallet.
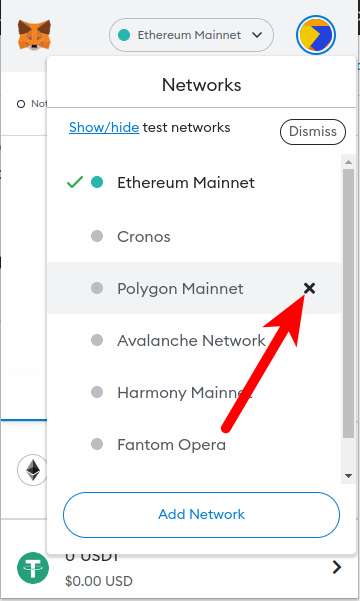
Step 3: Click on the “X” sign next to the network to be deleted.
Scroll down the list of available networks outlined on the popup menu until you find the network you want to remove.
Click on the “X” sign next to the network to remove it from your wallet.
Step 4: Hit [Delete] on the confirmation dialog.
Metamask will ask if you’re sure you want to delete the selected network. Click [Delete] to remove the network from your wallet.
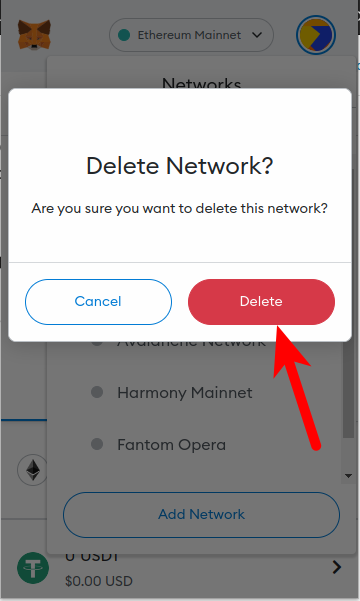
And that’s it, you have successfully removed/deleted a network from your Metamask wallet. You can repeat this step for as many networks as you wish to delete from your wallet.
How To Remove A Metamask Network On Mobile (Android & iPhone)
If you use Metamask exclusively on your mobile device via the Metamask mobile app, then the process of removing a network from your wallet is quite different when compared to the process of completing the same action on the Metamask extension.
Below is how you can remove a network on the Metamask mobile app for Android or iOS devices.
Step 1: Open the Metamask app and unlock your wallet.
Open the Metamask app on your device by tapping on the Metamask icon on your device. Enter your account password and hit [Unlock] to unlock your wallet.
If you have enabled Biometrics on the Metamask app, you should be able to unlock your wallet using any of the available biometric options on your device – FaceID, Fingerprint, or Face Unlock – without having to type in your account password.
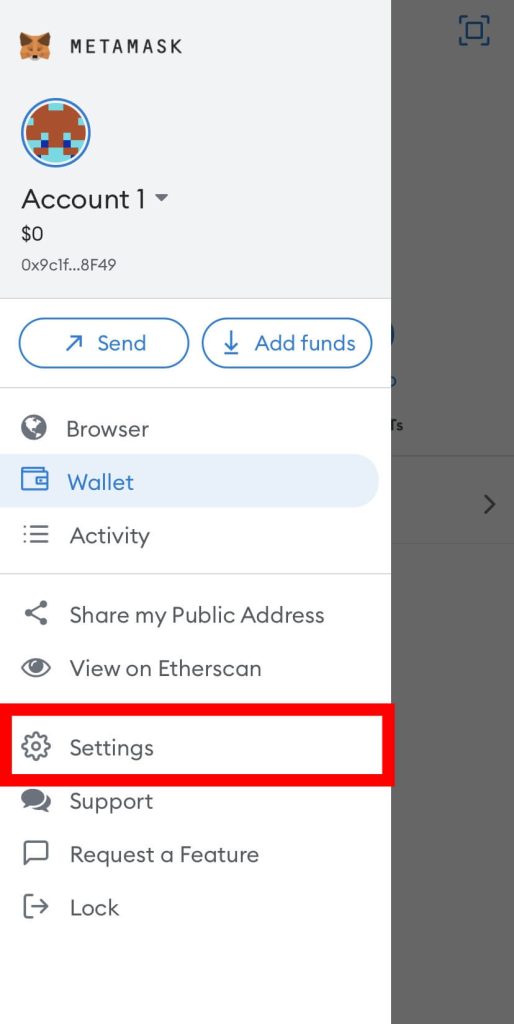
Step 2: Tap the menu icon on the Metamask home screen.
On the Metamask app home screen, tap the Menu icon to extend the Metamask menu as shown in the screenshot below.
Step 3: Select [Settings] from the menu options.
Next, select [Settings] from the menu items to open the Metamask Settings page.
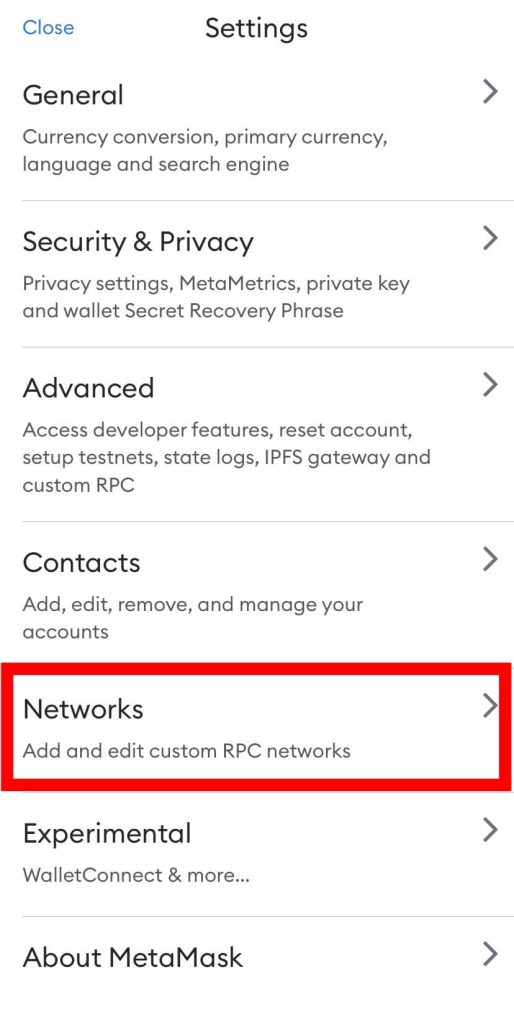
Step 4: Tap [Networks].
On the Metamask Settings, tap [Networks] to view a list of available networks on your Metamask wallet.
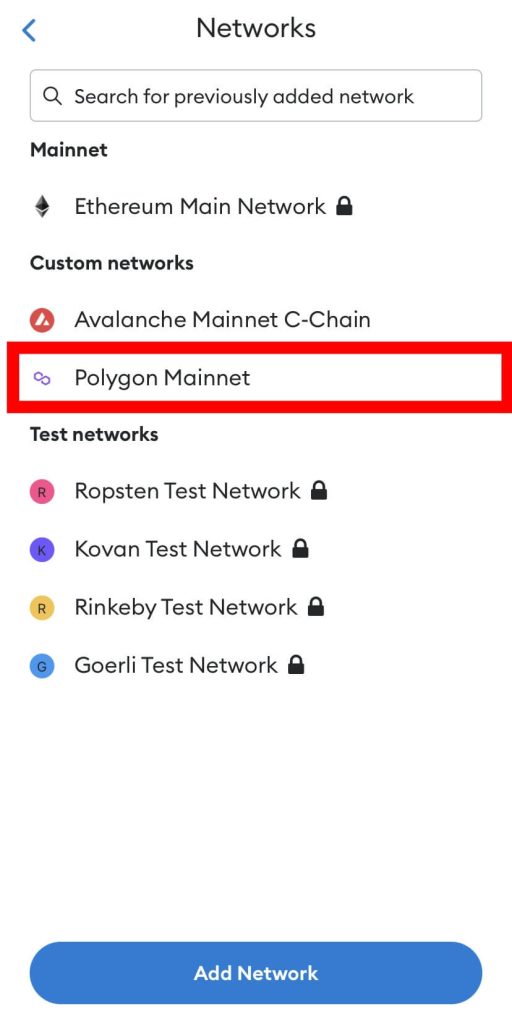
Step 5: Select the network you want to delete.
Now, select the network you want to delete in the “Custom networks” section.
Step 6: Tap [Delete] to remove the network.
Finally, hit the [Delete] button to remove the network from your wallet on the Metamask mobile app.
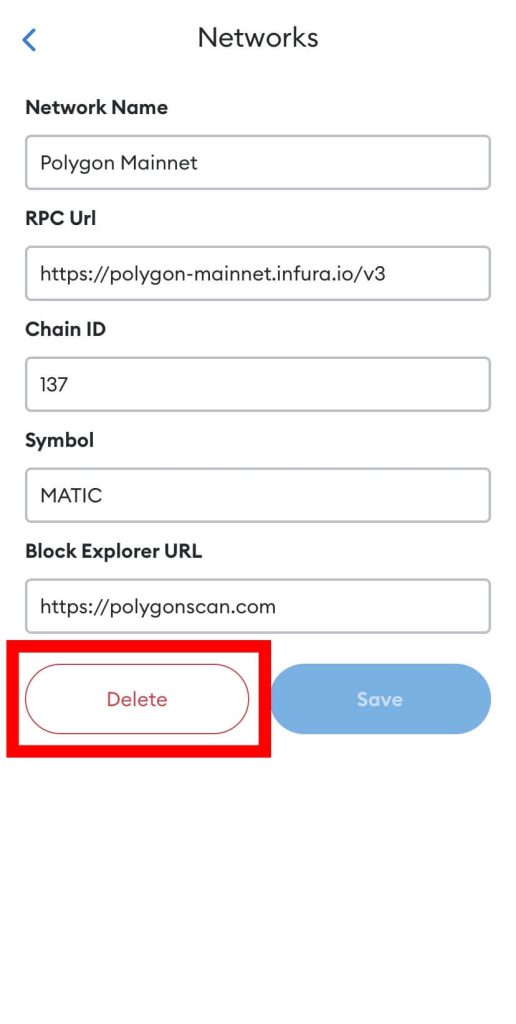
With this, you have successfully removed a network from your Metamask wallet on mobile.
How To Remove A Testnet From Metamask
There are a handful of test networks included on every Metamask installation and these networks like the Rinkeby Test Network, Goerli Test Network and more are alternative blockchains used by blockchain devs to test features before deploying to the mainnet.
If you’re not a blockchain developer, then testnets are useless and you can remove these networks from your wallet if you don’t want to see them any longer on the list of available networks on your wallet.
Here is how to remove all the testnets from your Metamask wallet.
Step 1: Click on your account icon and select [Settings].
On the home screen of the Metamask extension, click on your account icon and select [Settings] from the menu options to open the Metamask settings page.
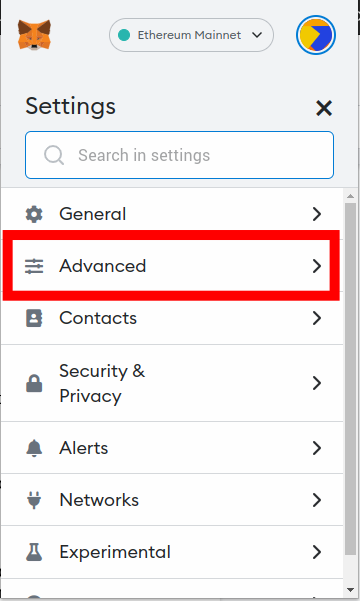
Step 2: Select [Advanced].
Next, select [Advanced] on the Metamask settings page.
Step 3: Toggle “show test networks” OFF.
Scroll down to the “Show test networks” section and toggle the switch OFF to hide all the Test Networks (TestNets) from the list of available networks on your wallet.
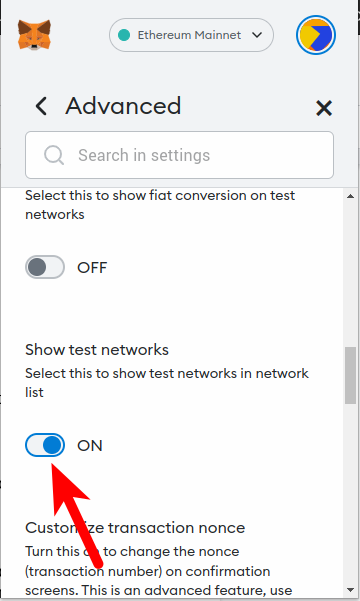
With this, you have successfully removed all the test networks from your Metamask wallet. You can always relist these networks by repeating the process but toggling the switch ON for the last step.
You currently cannot remove test networks from the Metamask mobile app and this guide will be updated when the feature is available.
Wrapping Up
Since you can manually add networks on both the Metamask extension and the mobile app, you can also remove them easily.
To remove a network from the Metamask extension, click on the network selector box to show a list of all available networks on your wallet. After that simply click on the “X” icon next to any network to remove the network from your wallet.
On the Metamask mobile app, things are quite different. First, navigate to the Settings page on the Metamask app and select Networks then select any network and hit Delete to remove the network from your wallet.
For Test Networks, you cannot remove them completely from your wallet, you can only hide them on the Metamask extension. You cannot hide or remove testnets on the Metamask mobile app.
Well, that’s will be a wrap on this guide about removing a network from Metamask. We hope you found this guide helpful if you were searching for a way to remove a Metamask network from your wallet.
How To Delete a Network From MetaMask

The cryptocurrency wallet MetaMask allows you to add any Ethereum-compatible custom network. But what happens when you no longer need some of the networks you’ve added?

The good news is that you can remove them in seconds. Read on to learn how to delete networks from MetaMask and get answers to some common questions regarding the topic.
How to Delete a Network From MetaMask on a PC
You can use MetaMask in your browser with the help of an extension. To remove a network on this interface, do the following:
- Install the MetaMask browser extension from the Chrome Web Store.

- Click the MetaMask icon in your extensions toolbar and unlock your account.

- Press the network selection bar at the top of the window to open your network list.

- Hover over the network you want to delete. An “X” icon will appear next to the network’s name.

- Click “X” and confirm your choice in the popup.

Another way to remove the networks you no longer need is through your settings.
- Open MetaMask by clicking the icon in your extension toolbar.
- Press your account icon in the top right corner.

- Choose “Settings,” then “Networks.”

- Click the network you want to remove.

- Press the “Delete” button at the bottom and again in the popup.

The network will disappear from your list immediately.
How to Delete a Network From MetaMask on an iPhone
You can also remove networks from MetaMask using an iPhone.
- Open the MetaMask iOS app and log in.

- Tap the hamburger menu in the top left corner and find your settings.

- Select “Networks” to see the list of your added networks.

- Press and hold the network you want to delete.

- Tap “Remove” in the popup.

How to Delete a Network From MetaMask on an Android
Delete a network from MetaMask on your Android device this way:
- Launch the MetaMask Android app and log in.

- Press the hamburger icon in the top left corner of the home screen.

- Tap “Settings” and then “Networks.”

- Long-press the network you want to delete.

- Confirm your choice, and the network will be removed from your list.

How to Delete a Network From MetaMask on an iPad
You can also use the MetaMask iOS app on your iPad. Here’s how to remove a network on this platform:
- Open the MetaMask iOS app on your iPad and log in.

- Tap the hamburger menu in the upper left corner of your screen.

- Go to “Settings,” then “Networks.”

- Long-press the network you want to remove.

- Select “Remove” in the popup, and you’re good to go.

How to Add Network to MetaMask
You might want to add a new network to your MetaMask after getting rid of those you don’t use. You can add networks directly through Chainlist or by doing so manually.
Add Network via Chainlist
To add a network through Chainlist on a PC, you’ll first need to connect your wallet on the website.
- Make sure you’ve unlocked your MetaMask browser extension.

- Go to the Chainlist website and click “Connect Wallet” in the top right corner.

- Confirm your decision in the popup.

Once connected, you can browse networks on Chainlist and add them to your MetaMask by clicking the “Add Chain” button.
To do this on mobile, use MetaMask’s built-in browser feature.
- Launch the MetaMask app and open the hamburger menu.
- Tap “Browser” and go to the Chainlist website.

- Connect your wallet by pressing the button.

- Add the network you want by tapping “Add chain.”

Add Network Manually
You can also add networks manually on PC and mobile in the following way:
- Open MetaMask and go into your settings.

- Select your Network settings.
- Click or tap “Add Network.”

- Fill in the details of the network and save the changes.

Additional FAQs
Can I delete any MetaMask network?
You can remove any of your custom MetaMask networks regardless of how you added the network. However, you can’t delete the default Ethereum Mainnet or the test networks. To remove the test networks, hide them by disabling them in your Advanced Settings.
I don’t have the delete option. What do I do?
If you tried to remove a MetaMask network by using a method outlined above and ran into an obstacle, ensure that the network isn’t currently selected. Select any other available network, and the delete option will become available. In addition, remember that the default and the test networks can’t be deleted.
Manage Your Networks Efficiently
MetaMask makes it easy to remove unused networks so they don’t clutter your list. Adding networks is just as simple, especially using the Chainlist method. Manage your networks by following these instructions and stay on top of your game.
Which method of removing networks from MetaMask do you prefer? Did the steps in this article make the process easier? Let us know in the comments section below.
Как удалить сеть в метамаск
Чтобы удалить счет в MetaMask, следуйте этим шагам:
- Откройте расширение MetaMask в вашем веб-браузере.
- В правом верхнем углу экрана щелкните на значке вашего аккаунта (обычно это иконка с инициалами или картинкой профиля).
- В открывшемся меню выберите «Настройки» или «Settings».
- В разделе «Настройки» прокрутите вниз и найдите раздел «Счета» или «Accounts».
- В разделе «Счета» вы увидите список всех ваших счетов. Найдите счет, который вы хотите удалить.
- Рядом с выбранным счетом будет иконка «Три точки» или другая иконка настройки. Щелкните по ней.
- В открывшемся меню выберите «Удалить» или «Remove».
- Подтвердите удаление счета, следуя инструкциям на экране.
После завершения этих шагов выбранный счет будет удален из MetaMask.
Важно отметить, что при удалении счета в MetaMask вам необходимо убедиться, что у вас есть доступ к резервной копии (12-словной фразе восстановления или JSON-файлу) для этого счета. Резервная копия необходима, чтобы восстановить доступ к вашему счету в случае потери или удаления счета.
Как удалить токены из Метамаск
Чтобы удалить токены из кошелька MetaMask, вам потребуется выполнить следующие шаги:
- Откройте расширение MetaMask в вашем веб-браузере.
- В правом верхнем углу экрана щелкните на значке вашего аккаунта (обычно это иконка с инициалами или картинкой профиля).
- В открывшемся меню выберите «Активы» или «Assets».
- В списке токенов найдите токен, который вы хотите удалить из кошелька MetaMask.
- Рядом с выбранным токеном будет иконка «Три точки» или другая иконка настройки. Щелкните по ней.
- В открывшемся меню выберите «Удалить» или «Remove».
- Подтвердите удаление токена, следуя инструкциям на экране.
После завершения этих шагов выбранный токен будет удален из списка активов в вашем кошельке MetaMask.
Однако важно отметить, что удаление токена из списка активов не приведет к удалению самого токена с блокчейна. Ваш кошелек MetaMask просто перестанет отображать этот токен в вашем списке активов. Токены всегда будут находиться в соответствующей блокчейн-сети, и вы сможете видеть их снова, добавив их обратно в ваш список активов, указав правильные детали контракта токена.
Обратите внимание, что некоторые токены могут быть скрыты в разделе «Активы». Чтобы показать скрытые токены, вы можете нажать на «Добавить токен» и указать адрес контракта токена вручную для его добавления в список активов.
Web server is returning an unknown error Error code 520
There is an unknown connection issue between Cloudflare and the origin web server. As a result, the web page can not be displayed.
What can I do?
If you are a visitor of this website:
Please try again in a few minutes.
If you are the owner of this website:
There is an issue between Cloudflare’s cache and your origin web server. Cloudflare monitors for these errors and automatically investigates the cause. To help support the investigation, you can pull the corresponding error log from your web server and submit it our support team. Please include the Ray ID (which is at the bottom of this error page). Additional troubleshooting resources.
Cloudflare Ray ID: 80ecd9eb4375b36c • Your IP: Click to reveal 45.84.122.41 • Performance & security by Cloudflare